This is a series of tips and tricks about creating editor extensions. We’re going to look at creating a custom console that looks and behaves exactly like the one in Unity, and eventually add more features to it.
You can find part 2 here
Custom Logging
Fist things first – before we draw any messages or buttons anywhere, we need to figure out how to receive log messages from code. There is a number of ways you can do that.
Log class
One solution would be to create a custom static class, that has a bunch of log routines like Log.Info(string message), Log.Warning(string message). This allows you to be very flexible with how you log your data (if you don’t like how Unity’s doing it). For instance, you can add a flag to disable stack trace on certain messages to improve logging performance. However, it will be hard to use it with existing projects that already employ the default console interface. Also, Unity’s internal messages – like exceptions and warning will still use the default console – so you’ll end up needing two windows.
public static class Log
{
    public static void Info(string message, UnityEngine.Object context, bool stackTrace = false, bool logToFile = true)
    {
        //log info
    }
}
Log Callback
A simple way around the internal message issue is to use Application.LogCallback, which more or less gives you all the info sent to the console for you to do whatever you want with it.
This works pretty well for most purposes, but the issue with Application.LogCallback is that it doesn’t really redirect the console output – it merely copies it. This means that behind the scenes, Unity is still doing all it’s console routines like getting the stack trace, and updating all it’s data structures that help with logging. That is something that you might not want if you’re going for a full console replacement. Also, the log callback doesn’t really provide you with the object that logged the message.
public static class Log
{
    static Log()
    {
        Application.logMessageReceived += DefaultLog;
    }

    void DefaultLog(string logString, string stackTrace, LogType type)
    {
         if(type == LogType.Log)
         {
             Info(logString, null, true, true);
         }
       /*else
         ... other types here
      */
    }
    public static void Info(string message, UnityEngine.Object context, bool stackTrace = false, bool logToFile = true)
    {
        //log info
    }
}
ILogHandler
The Debug class allow it’s users to install their own log handlers in order to process the log output themselves. This is done through Debug.logger.logHandler and you need to supply a class that implements the ILogHandler interface. All console output will be redirected though the your custom class now – no messages will be logger in the console or the editor log.
Initialize On Load
Now the question is when to install your log handler class. Ideally you don’t want to explicitly add this code to every project that uses your console. Also, Unity projects don’t really have a clearly defined starting point.
You can use Script Execution Order to run something before all other scripts, but that still requires you to modify the project before you can use your custom console. Luckily, Unity provides just the thing we need – the InitializeOnLoad attribute makes the engine call a static constructor of the class, right after the scripts have been loaded.
Thus, our custom log handler becomes something like this.
[InitializeOnLoad]
public class LogHandler : ILogHandler
{
    public static ILogHandler DefaultHandler { get; private set; }
    private static LogHandler handler;

    static LogHandler()
    {
        DefaultHandler = Debug.logger.logHandler;
        handler = new LogHandler();
        Debug.logger.logHandler = handler;
    }

    public void LogException(Exception exception, UnityEngine.Object context)
    {
        //handle exceptions here
    }

    public void LogFormat(LogType logType, UnityEngine.Object context, string format, params object[] args)
    {
        //handle log here
    }
}
As you can see we’re saving a reference to the default log handler, so we can still log messages to the original console when we need to. Also, to get the stack trace, you can use Unity’s StackTraceUtility. Keep in mind that it will give you the stack trace up to that point in code – you’ll need to do some formatting to get the correct stack trace.
The Window
The only requirement to creating a new editor window seems to be that you need to subclass EditorWindow class, and of course, draw something in the OnGUI method. Showing the window can be done in a number of ways, mostly involving calling EditorWindow.Show() on your window class.
However, if you want to open your window using a menu entry in Unity you need to provide a static method with a MenuItem attribute attached to it.
[MenuItem("Window/CustomConsole")]
public static void Show()
{
}

If you open the Window menu in the Editor you will find the new menu entry we’ve just added. Naturally, you can add as many menu entries for the same window as you like – each can set some specific parameters, or load data before showing the window.
Since every EditorWindow is in fact a ScriptableObject (we’ll get into that later), a window should be created using the CreateInstance method. Thus, it is not recommended to have any initialization in the constructor of the window class, unless you really know what you are doing (and let’s face it – none of us really do).
[MenuItem("Window/CustomConsole")]
public static void Show()
{
    var myWindow = ScriptableObject.CreateInstance();
    myWindow.ShowWindow();
}
The initialization code for an editor window is best put in the OnEnable. The window object will also receive callbacks for OnGUI, Update, OnDisable (when you close the window) and OnDestroy, which seems to be called right after you close the window. (At the moment of writing this I still haven’t found a way to keep the window alive after you close it)
To help you with some of the bookkeeping Unity provides a static method – EditorWindow.GetWindow. When no window of that type exists, GetWindow creates a new one and shows it, otherwise it returns a reference to the existing window.
[MenuItem("Window/CustomConsole")]
public static void Show()
{
    EditorWindow.GetWindow("Console");
}
Styles
Now, that we have our window in place, we want it to look exactly like the original console. In general it’s useful to have your editor extensions emulate the original look and feel of the editor – it makes it easier to work with them and they’re more visually pleasing. This is one aspect, where Unity definitely falls short – it does provide a limited list of styles that can be used directly, but that quickly becomes insufficient as you try to do anything beyond the basic UI.
EditorStyles
EditorStyles is a static object that provides a reference to a lot of styles that are used in drawing the editor. These can be quickly incorporated in your custom gui, but they don’t provide you with the whole picture.
The Editor Skin
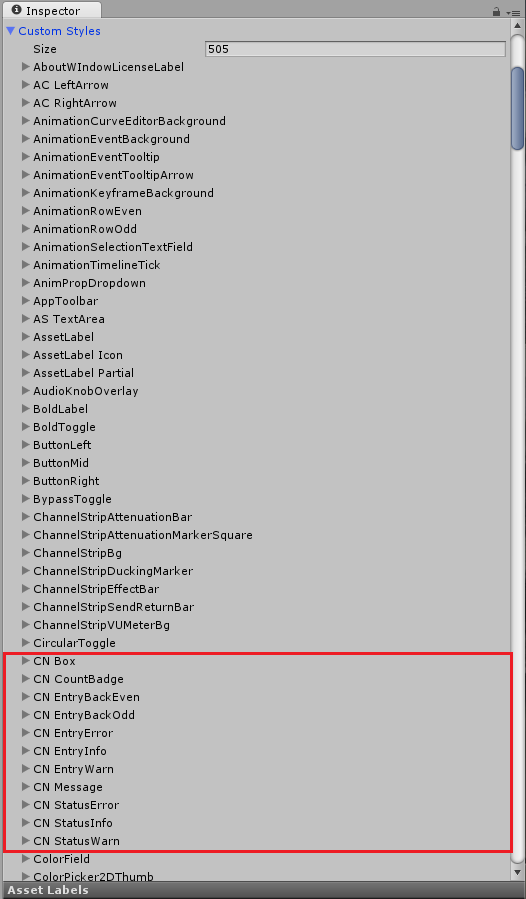
The default editor skin holds all the styles that are used in drawing the editor, “hidden” in the Custom Styles list.
In order to figure out what we can use from the editor styles, or even reference them we need to access the custom style data. The best way to access the custom styles would be to simply save the editor skin in the assets(thus, extracting it from the hidden editor assets), which can be achieved with the snippet below. Note that you can also save GUI.skin – it’s the same skin, but you need to access in in the OnGUI method.
[MenuItem("Assets/Editor Skin")]
static public void SaveEditorSkin()
{
    GUISkin skin = Instantiate(EditorGUIUtility.GetBuiltinSkin(EditorSkin.Inspector));
    AssetDatabase.CreateAsset(skin, "Assets/EditorSkin.guiskin");
}
When you select the corresponding menu item, you’ll find the editor skin in your assets folder. You’ll find that there are quite a lot of custom styles used in the editor, luckily the styles we need most are close to the top.
In order to access a certain style during runtime you can simply call GUI.skin.GetStyle("CN EntryBackEven"). I’ve found that styles like EditorStyles.toolbar and GUI.skin.GetStyle("Toolbar") seem to be interchangable, so you can choose to use one or the other.
Now that we have our styles in place, we can use them do draw some of the basic elements of our console in the next part.


this series is very useful.Expect part 2
LikeLike
Part 2 is out, you can find it here.
LikeLike
thanks! how can i connected the new console window with the new loghandler?
LikeLike